Breastfeeding

Breastfeeding

FAQ

Breastfeeding products

Manual Breast Pump

Using your MAM Manual Breast Pump is simple and designed for comfort.

1. Preparation 
  • Start by ensuring all pump parts are clean and sterilised. 
  • Assemble the pump according to the instructions provided.  
  • Wash your hands, breast, and nipples thoroughly, and squeeze a small amount of milk to ensure milk ducts are clear.
2. Find a comfortable position
  • Sit in a comfortable, relaxed position. 
  • Position the pump’s funnel over your nipple, ensuring a good seal for effective suction. 
  • Support the breast with your hand from below and hold the funnel onto your breast with your thumb and index finger.
3. Begin pumping
  • Use your other hand for pumping by holding the adaptor neck with your thumb and the handle with your remaining fingers. 
  • Press and release the handle to operate the pump at a speed of approximately 60 times per minute. 
4. Adjust as needed
We recommend a faster pump rhythm to stimulate milk flow. Once the milk starts flowing, you can switch to a slower rhythm. The ergonomic handle allows for easy control, reducing hand fatigue during use. 

5. Store or feed
Once you've finished expressing, carefully remove the pump, and transfer the milk to a feeding bottle or storage container.

  • Before using your MAM Manual Breast Pump for the first time and after each use, all parts that come into contact with the breast and breast milk must be separated, cleaned and sterilised
  • Wash all parts in warm, soapy water, and rinse thoroughly before sterilising them (by boiling, in a steam steriliser, or with a cold sterilising solution). 
  • Dry the parts with a clean cloth or let them air dry. 
  • Allow all parts of the Breast Pump to fully cool and dry before use. 
  • Follow the steps in the user manual for proper cleaning and sterilising.

Yes, all parts can be cleaned in the dishwasher, preferably on its top rack or in the cutlery section.

We recommend to carefully clean small parts such as the valve body and valve membrane by hand to prevent damages and to ensure that those small components do not get lost.

Yes, the MAM Manual Breast Pump can be used with or without the silicone insert, allowing you to personalise your pumping experience. 

  • Pumping with the silicone insert provides a softer, cushioned feel, which can enhance comfort for those with sensitive skin. It’s ideal for users who may need gentler stimulation during expressing.
  • Pumping without the silicone insert offers a firmer contact with the breast shield, which some users find more effective for milk expression. 
Once you become more comfortable with expressing, you may want to remove the insert to improve your pumping experience. You can try both options to see which feels best for you and helps you achieve optimal milk flow comfortably.

Expressing milk or stimulating does not come easily to everyone. 
Please contact your healthcare professional if you express minimal or no milk, or if expression is uncomfortable or painful.
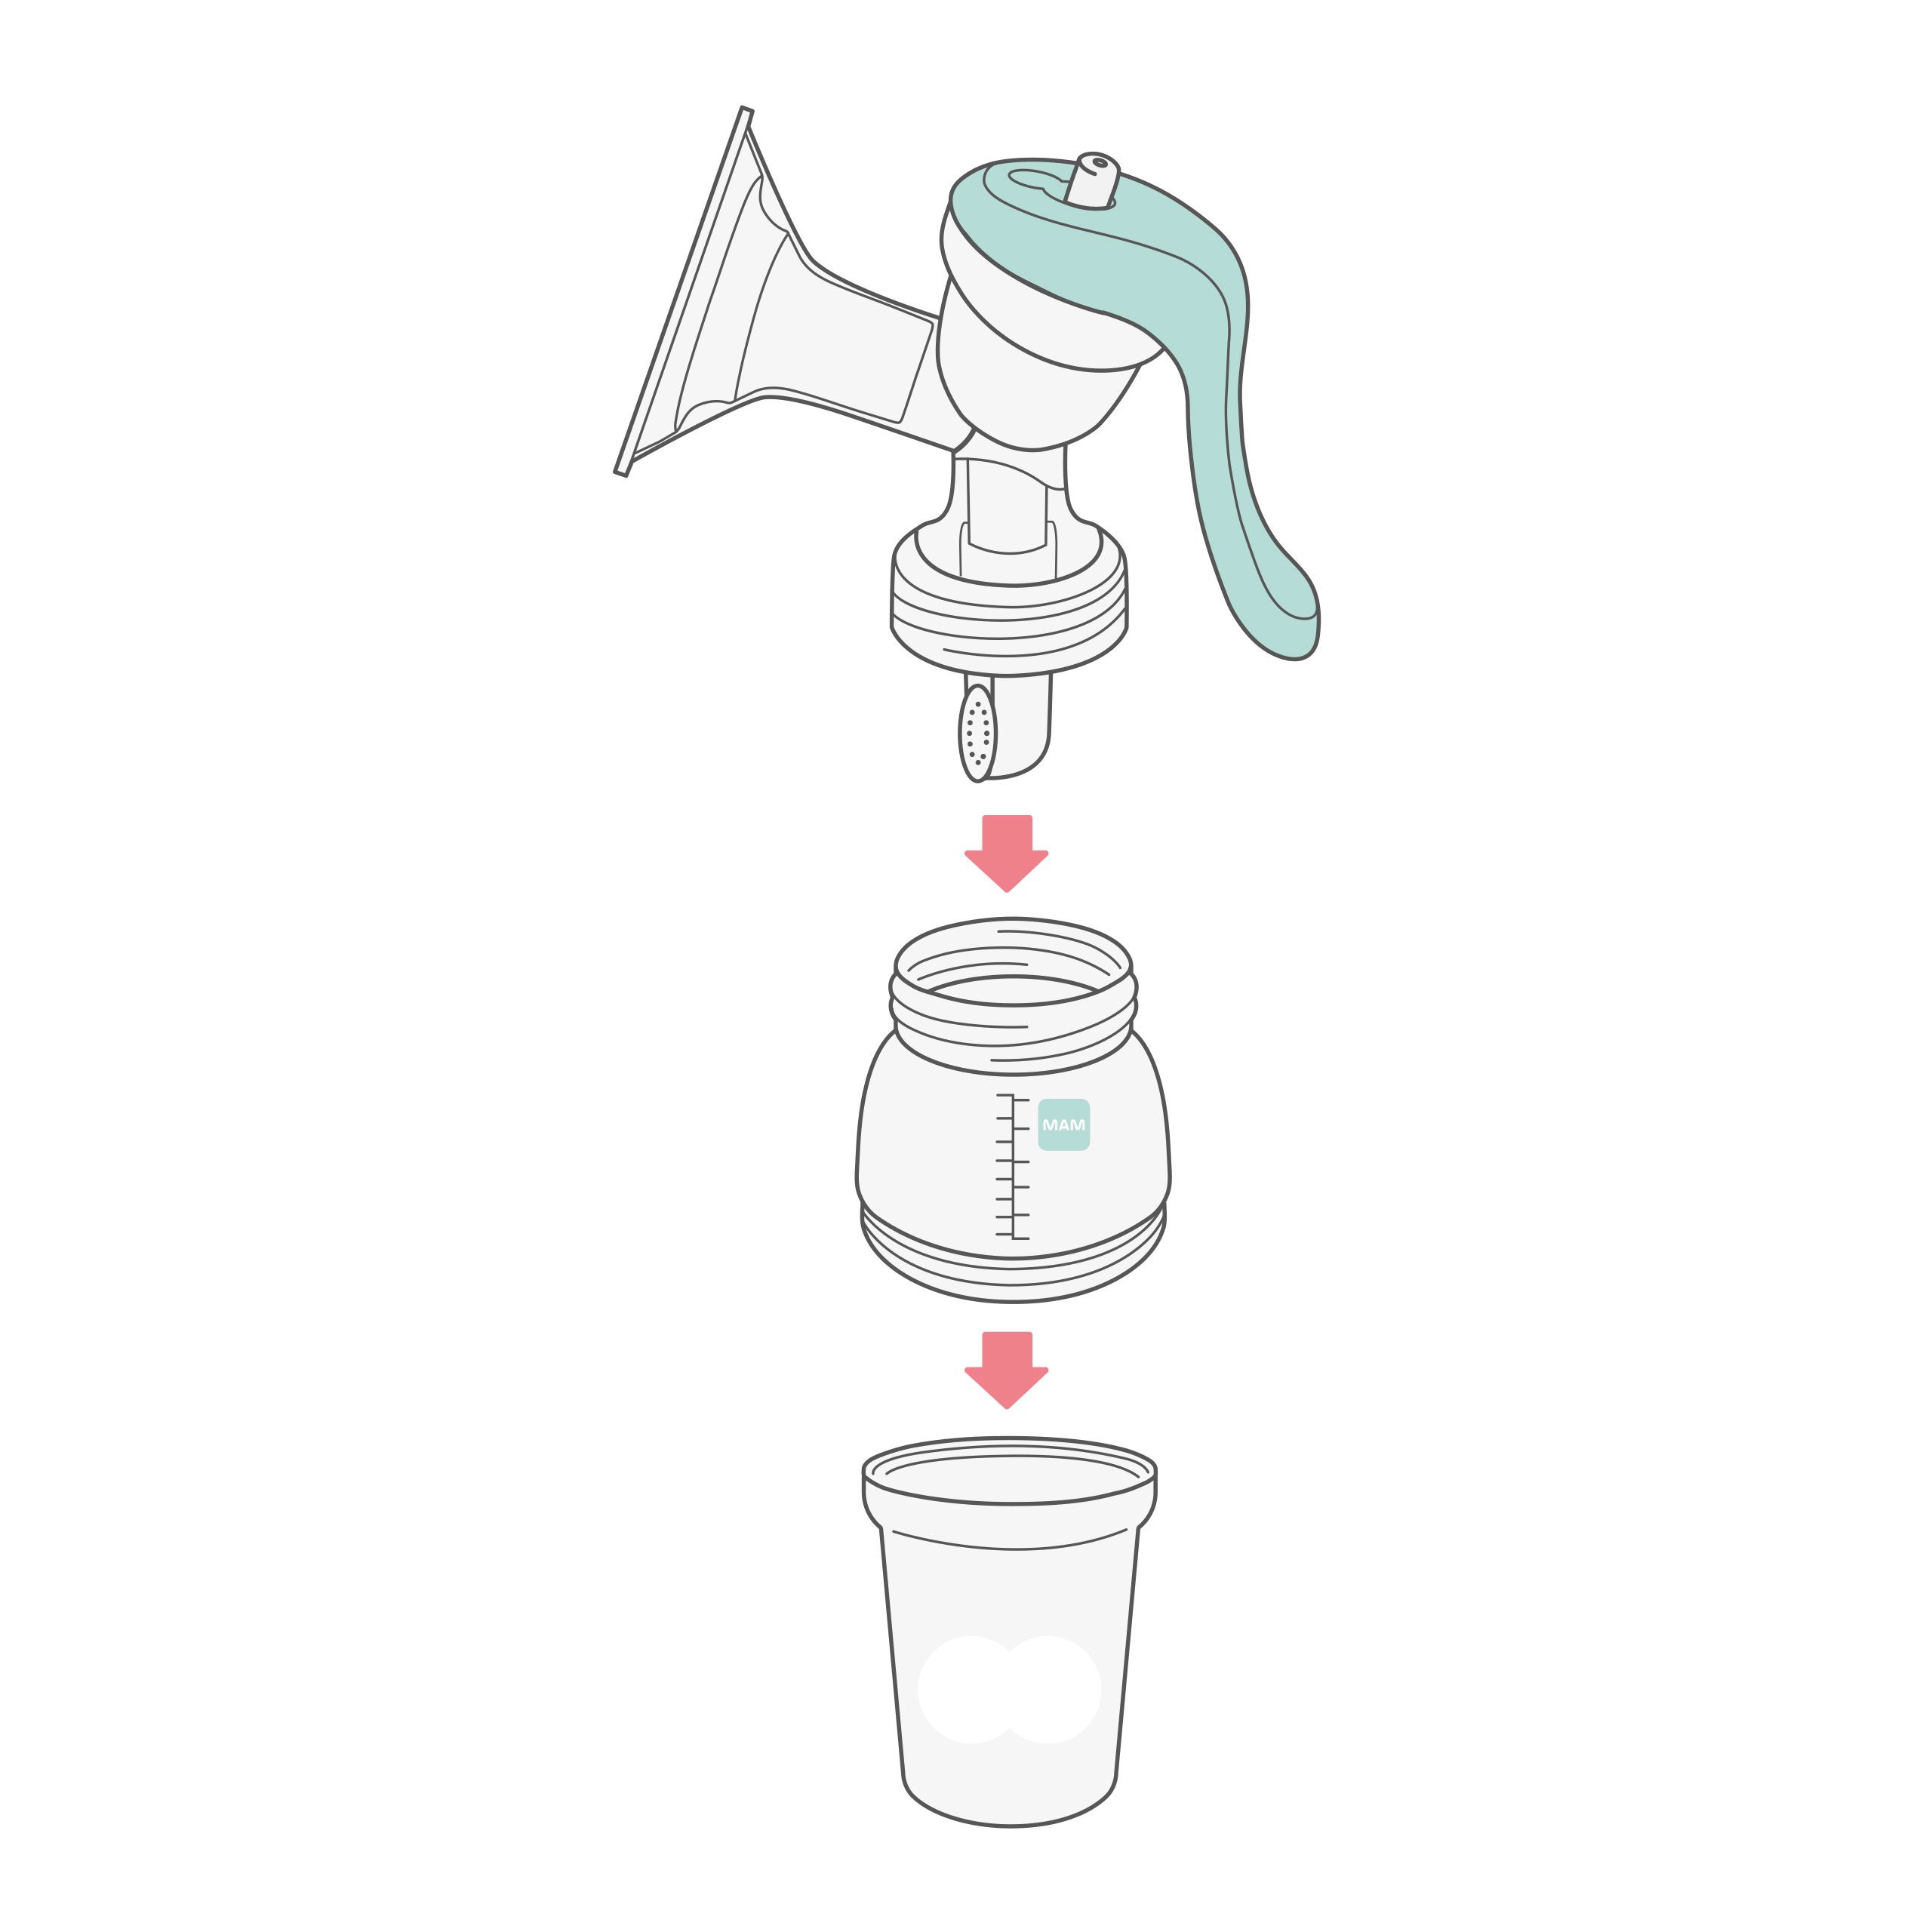
Yes, the MAM Manual Breast Pump is compatible with MAM Storage Solution, allowing you to pump directly into the container for safe, hygienic storage. To use the Storage Solution with the pump: 

  • First, ensure all parts are clean and sterilised
  • Remove the Easy Start Anti-Colic base with its silicone valve. 
  • Screw the Storage Solution on in its place, ensuring it is tightly sealed to prevent leakage. 
  • Bring the pump to the breast and express. Please refer to the instructions for manual pumping in your user manual. 
  • Unscrew the Storage Solution after finishing your pumping session and close securely with the lid. 
This setup allows for easy transfer of milk from pump to freezer or fridge, as the MAM Storage Solution containers are designed for convenient storage and freezing.
Expressed milk can be stored in the fridge for up to 72 hours or in the freezer for up to 3 months
For freezing, only use the MAM Storage Solution, not the MAM Easy Start bottle.
  • Ensure all parts are connected correctly.
  • In case you are using the silicone cushion: Ensure that the silicone cushion is firmly seated in the funnel adapter.
  • Ensure that the valve body is firmly connected to the funnel adapter.
  • Ensure that the membrane cap/handle holder is properly connected.
  • Ensure that the breast shield forms a complete seal around the breast, with no air entering through the side.
Each MAM Manual Breast Pump contains two extra valve membranes, as we are aware that such a small part can easily get lost. You can find the spare parts in a plastic bag inside your packaging.
If you require additional replacement parts due to damage or loss, please contact our customer service.

Nipple Shields

MAM Nipple Shields are intended as short-term breastfeeding aid. The use of Nipple shields can be beneficial in the following situations:

  • Sore Nipples: Nipple Shields can provide relief for sore nipples, allowing to continue breastfeeding while healing occurs.
  • Flat or Inverted Nipples: For mothers with flat or inverted nipples, nipple shields can help draw out the nipple, making it easier for the baby to latch on.
  • Latching Difficulties: If your baby is having trouble latching correctly, a nipple shield can assist in creating a more effective latch.
 Only use nipple shields in consultation with a midwife, lactation consultant or health advisor.

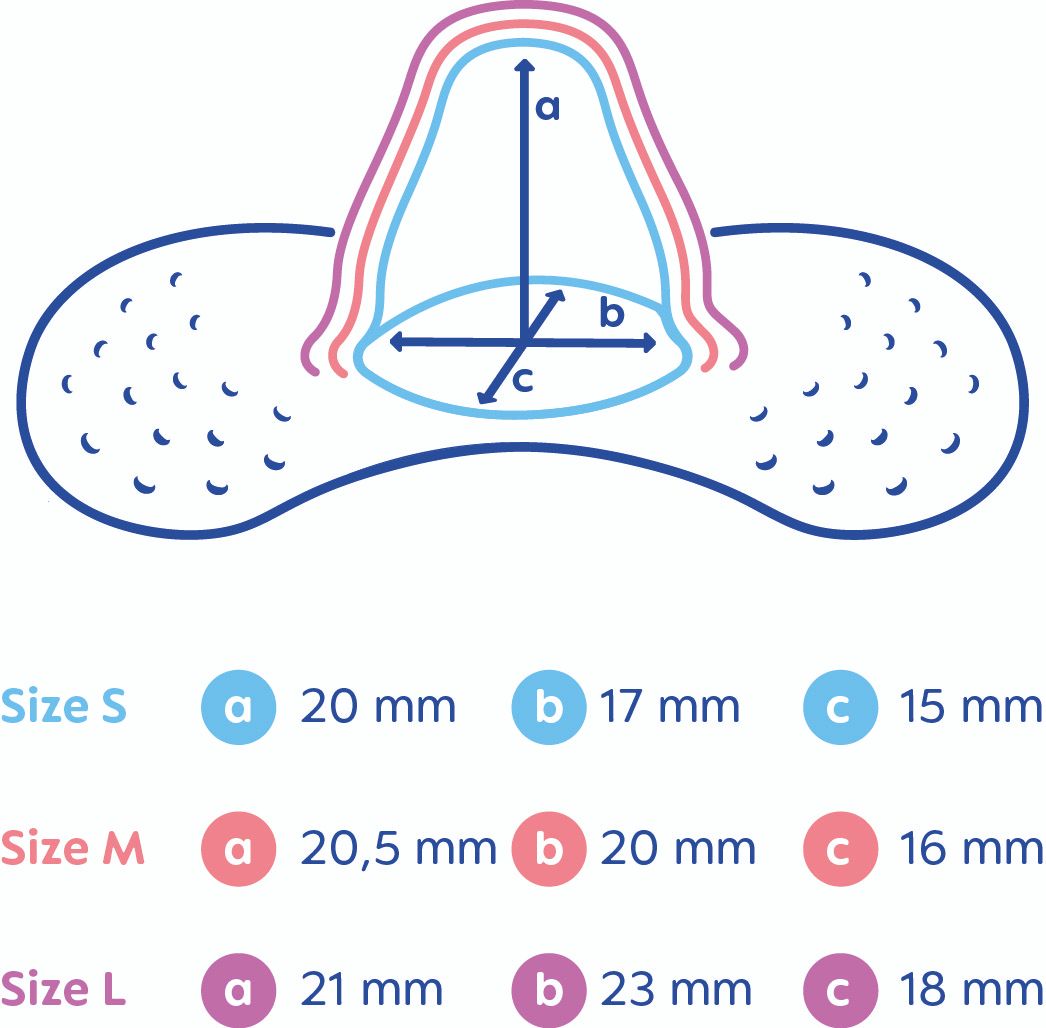
MAM Nipple Shields are available in three different sizes

  1. Wash your hands.
  2. Sterilise the Nipple Shields. Let them cool.
  3. Invert the wings.
  4. Place on nipple and smooth out wings. Check that the shield fits the nipple and is firmly attached before breastfeeding. 
  5. Let your baby latch. Baby’s lips should completely surround the base of the nipple shield, not just the tip of it. Make sure that the baby’s nose and chin are positioned in the cut-outs provided.
Clean nipple shields before first and after each use. 
Before first use place nipple shields in boiling water for 5 minutes. This is to ensure hygiene.

Cleaning
There are two recommended methods for cleaning MAM Nipple Shields:

1. Cleaning by hand 
Begin by rinsing the MAM Nipple Shields in cold, clear water. Then wash thoroughly in warm, soapy water using a mild detergent. After washing, rinse the shield with cold, clean water.

2. Cleaning in the dishwasher
The Nipple Shields can be cleaned in the dishwasher at a temperature of max. 65 °C, using commercially available dishwashing detergent. It is recommended to place them on the top rack of the dishwasher.

Sterilising

There are four recommended methods for sterilising MAM Nipple Shields:

1. Sterilisation through boiling
Boil the Nipple Shields in fresh water for at least 5 minutes.

2. Sterilisation using the MAM Microwave Steriliser & Carry Box 
When using the self-sterilising method, please ensure the Nipple Shields, box and microwave (including the waveguide-cover and turntable) are COMPLETELY CLEAN and free from dirt, food residue, fat or oil splashes. If not, this could lead to the product or box melting and the microwave sparking or the waveguide cover burning! 

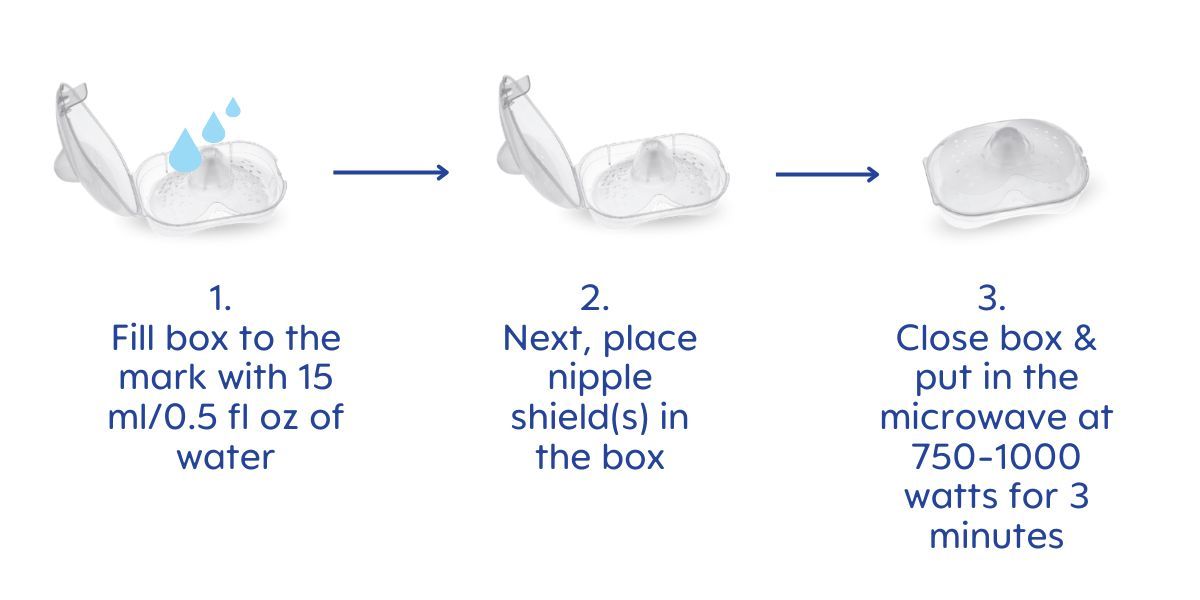
  • First, hold box and fill to the mark with 15 ml / 0.5 fl oz of water. 
  • Next, place nipple shield(s) in the box, up to 2 shields can be sterilised in one box. 
  • Close the box and heat in the microwave at 750 – 1000 watts for 3 minutes. Up to 2 boxes can be sterilised at the same time. Follow the user manual of your microwave. 
  • Don’t put the steriliser box at the center of the turntable. 
  • Don’t leave your microwave unattended during the sterilising process! Stop the microwaving-process immediately if whole water is vaporised. 
  • Allow to cool for at least 3 minutes. Open microwave.  
  • CAUTION! The box, water and Nipple Shields may still be very hot after the 3-minute cooling period! 
  • After microwave sterilising, Nipple Shields kept in the closed box will remain disinfected for up to 48 hours. 
  • For immediate use open box and drain remaining water. 
  • Leave Nipple Shields to dry in slightly open box. 
  • Check the temperature of the Nipple Shields before use! 
  • Improper water level, power level or time setting can damage the microwave, Nipple Shields and box and result in poor disinfection! 
  • For use only with MAM Nipple Shields! 
  • Keep the steriliser box away from children.

3. Steam sterilising 
Electric or microwave steam sterilising according to manufacturers instructions.

4. Liquid sterilising solution
In order to store sterilised nipple shields hygienically, keep them in the closed sterilised carry box.